Showing posts with label tips. Show all posts

2/10/2013

ASP.NET MVC 4 Highlights: Bundling and Minification

By: John V. Petersen


In the first installment of this series, I explored a few of the new features in ASP.NET MVC 4, including the new default project templates, mobile templates, and display modes. Since that article, ASP.NET MVC 4 has been released to beta. For brevity’s sake, when I refer to MVC the design pattern, I’m referring to the ASP.NET implementation of the pattern. In this installment, I’m going to focus on one of MVC’s most useful features: integrated JavaScript and CSS bundling and minification.
One of the most important considerations in any Web application is the size of the content rendered to the browser. Bundling and minification handle two important tasks. First, all of the disparate JavaScript and CSS files are combined into one or more files. Second, the JavaScript and CSS code is minified by means of removing all of the carriage returns and line feeds as well as verbose variable names in favor of shorter (less verbose) alternatives.
With bundling, there are fewer resources that need to be rendered to the browser. With minification, the size of such resources is much smaller, often by as much as 70% or more!
These are not new concepts. Tools like JSMin and YUI have been around for several years. You have always been able to incorporate these bundling and minification solutions. What’s new are the integrated features baked into the MVC framework that handle these bundling and minification tasks out of the box.
Bundling and Minification “Out of the Box”
Figure 1 illustrates what you get out of the box for bundling and minification. Like all ASP.NET applications, everything starts in the Global.asax Application_Start() event handling code.
Click for a larger version of this image.

Figure 1: These code windows represent the out-of-the-box bundling and minification implementation in Global.asax and _Layout.cshtml.

In that code, there’s a call to:
BundleTable.Bundles.RegisterTemplateBundles();
The code for this method is burned into the System.Web.Optimization.dll. Figure 2 illustrates what that code looks like.
Click for a larger version of this image.

Figure 2: This code represents the out-of-the-box implementation code for RegisterTemplateBundles in System.Web.Optimization.

The code is straightforward in that bundles are created and files are added to the bundles. There are two ways to add files. One way is to refer to the file specifically. The second way is to specify a directory along with a file pattern search string. In the second method, the code can selectively traverse subdirectories to add content.
Each method has their respective pros and cons. When you specify the files, you know exactly what is getting into your bundled and minified files. This method requires more code. When you add directories, you don’t have to write as much code, but the possibility exists for unwanted code in the bundled and minified file. Choosing between adding files, directories or some combinatin thereof is a matter personal preference.
To use this functionality, there are a few concepts you must be familiar with:
  • Bundle Class: Encapsulates one or more files to be bundled and minified
  • AddFile() Method: Adds a specifically named file to the bundle
  • AddDirectory() Method: Adds files that match a file search string within the specified directory
  • Transform Property: An instance of IBundlerTransform, the object in this property performs the minification task
  • Path Property: The string that identifies the bundle within the Bundles Member in BundleTables
As you will see in a moment, as is custom in MVC, if you don’t like the default out of the box functionality in MVC, you can substitute your own functionality. First, take a look at what the default functionality gives you. Figure 3 illustrates how the disparate javaScript (JS) and Cascading Style Sheet (CSS) files are rendered to the browser.
Click for a larger version of this image.

Figure 3: The network view lists the bundled and minified CSS and JS files (with a query string parameter that is explained in the next section).

Note the file paths:
/Content/css/Content/themes/base/css/Scripts/js
These are the paths specified when the bundles were created. Figure 4 illustrates how the minified JavaScript appears.
Click for a larger version of this image.

Figure 4: This is the minified and bundled JavaScript content as rendered to the browser.

Why Is a Query String Parameter Added to the JavaScript and CSS Files?
Every time the page is refreshed, the server-side code is executed, causing the _Layout.cshtml Razor Template to evaluate. You always want the client to recognize the latest JavaScript and CSS content. If the file were always named the same, the browser may reference its cache. This behavior can always be configured at the browser level. However, that is not usually a feasible solution because it requires each computer to be specifically configured. If you have the chance to control behaviors that are essential to your applications at the server level, take it! With the addition of the query string, the client will interpret this to be a new file and therefore, rely on its cache.
You might be thinking that the call to ResolveBundleUrl is required for the bundling and minification to work. It’s not. To illustrate, I’ll replace the code for /Content/css with the following:
<link href="~/Content/css" rel="stylesheet" type="text/css" />
Figure 5 illustrates that bundling and minification still takes place. The only difference is the file name. Without the call to ResolveBundleUrl, the query string parameter is not added.
Click for a larger version of this image.

Figure 5: If the ResolveBundleUrl call is omitted, a query string parameter will not be added.

Essentially, that’s it! That’s what we get for free. But what about debugging? I don’t want my code minified in those cases. Am I stuck?
Of course not! In MVC, with almost no exception, you can override the default out-of-the-box behavior for your own behavior. In the next section, you will see how to create your own custom bundler and minification class.

Creating a Custom Bundler
If there are limitations to how the bundling and minification feature is implemented in the beta, these two would be at the top of the list:
  • The code to create the bundles is burned in a dll.
  • There is no way to make the default functionality sensitive to debug vs. release modes.
While bundling is something you probably always want, minification isn’t. While debugging, you need the unminified code to be rendered. Out of the box, using the default bundler, you cannot conditionally bundle. Let’s solve that problem now. The custom bundler code in Listing 1 solves the problem.
What’s the Second Bool Variable in AddFile()?
The second Bool Variable is the throwIfNotExist parameter. If the specified file does not exist, you can elect to have an exception thrown. In the default beta implementation, this parameter is set to false.
If you don’t want to be explicit with your files, the code could be simplified to what is illustrated in Listing 2.
The AddDirectory() method has four parameters:
  • directoryVirtualPath: the root directory used to search for files to bundle and minify
  • searchPattern: specifies the pattern to limit which files are included in the bundle
  • searchSubDirectories: if true, the process recursively searches all contained subdirectories under the directoryVirtualPath
  • throwIfNotExist: if true, the process throws an exception if the specified directoryVirtualPath does not exist
In this simplified code, every js file under /Scripts and every CSS file under /Content is included.
In both cases, a compiler directive is added to specify the transformer used to drive the minification process. Out of the box, there is a class called NoTransform. As the name implies, this class does not minify. You need such a class because the bundler instance requires a transformer:
var bundle = new Bundle("~/Scripts/js", jstransformer);
The bundler does not care what the transformer does. As long as it gets an instance that conforms to IBundleTransformer, the Bundle instance will be happy. Listing 3 shows what the NoTransform class is.
I Like the YUI Minifier; Can I Use That?
The nice thing about the way bundling and minification was implemented in ASP.NET MVC is that you don’t have to give up using utilities that you are currently using. The implementation works very much like the way IDependencyResolver works. In Version 3, an inversion of control container adapter was added to abstract away the details of any specific IoC container from the framework. The bundling and minification process illustrated here works very much the same way. The process begins with creating a custom instance of IbundlerTransform, as shown in Listing 4.
To take advantage of the YUICompressor Transform Class, the code in Listing 2 that loads the proper transformer must be changed to the following:
bool isDebug;
#if DEBUG isDebug = true; #endif
if (isDebug) { jstransformer = new NoTransform("text/javascript"); csstransformer = new NoTransform("text/css"); } else { jstransformer = new YUITransform(contentType.javascript); csstransformer = new YUITransform(contentType.css); }
I changed the debug-checking process slightly, because I am gradually moving to a solution that is testable. The next step involves creating a custom abstraction over the base Bundle Class that begins to abstract away the details of which files to add. I’ll leave that exercise to you to explore.
File Ordering within a Bundle
By default, JavaScript files are first ordered alphabetically within a bundle. Then, the files are restacked around known libraries. For example, jQuery - related files occur first in the bundle. Within the jQuery group, the files are sorted alphabetically. For CSS files, the files are first sorted alphabetically. Then, if the files reset.css or normalize.css exist, that content appears at the top of the bundled CSS file. Figure 6 illustrates this behavior in the bundled CSS file. Like everything else, this behavior is completely customizable. The Bundle Class has an Orderer property that conforms to the IBundleOrderer interface.
Click for a larger version of this image.

Figure 6: The Bundle.Orderer Property controls how files are ordered within the bundle.

Conclusion
With each release, the ASP.NET MVC Framework gets better and better. Bundling and minification is an essential process that needs to be in every production Web app that relies on significant JavaScript and CSS resources. Out of the box, the functionality is pretty good. There are, however, some missing pieces. Fortunately, the process was designed with customization and extensibility in mind. With a little effort, it was easy to toggle minification based on whether or not the application was being run under debug mode.
One final point, this article was based on beta software. The usual disclaimer applies - this functionality may change when the product is released to manufacturing (RTM).
John V. Petersen
&

SPONSORED SIDEBAR: Learn ASP.NET MVC in a Day!

ASP.NET is one of the world’s most popular Web development environments. We can help you with all ASP.NET projects as well as related technologies, such as HTML (4 and 5), JavaScript, jQuery, CSS, AJAX, services, and many more. (Learn more from www.codemag.com/consulting.)
That’s why CODE Training is offering a full day of training in ASP.NET MVC from CODE Consultants, experts in Web development. CODE Training and EPS Software will be holding an intensive one-day lecture, June 5, 2012, on ASP.NET MVC specifically designed for developers of business applications. Learn how, when and why to use ASP.NET MVC for the best result in your projects. Only $399!
Visit www.codemag.com/training to find out a little bit more about the class, or send an e-mail to info@codemag.com for more information.


Listing 1: Custom bundler class
using System;using System.Linq;using System.Web.Optimization;
namespace MVC4BundleUI{ public class MyBundler { public static void init() { IBundleTransform jstransformer; IBundleTransform csstransformer;
#if DEBUGjstransformer = new NoTransform("text/javascript"); csstransformer = new NoTransform("text/css"); #else jstransformer = new JsMinify(); csstransformer = new CssMinify(); #endif
var bundle = new Bundle("~/Scripts/js", jstransformer);
bundle.AddFile("~/Scripts/jquery-1.6.2.js", true); bundle.AddFile("~/Scripts/jquery-ui-1.8.11.js", true); bundle.AddFile("~/Scripts/jquery.validate.unobtrusive.js", true); bundle.AddFile("~/Scripts/jquery.unobtrusive-ajax.js", true); bundle.AddFile("~/Scripts/jquery.validate.js", true); bundle.AddFile("~/Scripts/modernizr-2.0.6-development-only.js", true); bundle.AddFile("~/Scripts/AjaxLogin.js", true); bundle.AddFile("~/Scripts/knockout-2.0.0.debug.js", true);
BundleTable.Bundles.Add(bundle);
bundle = new Bundle("~/Content/css", csstransformer);
bundle.AddFile("~/Content/site.css", true);
BundleTable.Bundles.Add(bundle);
bundle = new Bundle("~/Content/themes/base/css", csstransformer);
bundle.AddFile("~/Content/themes/base/jquery.ui.core.css", true); bundle.AddFile("~/Content/themes/base/jquery.ui.resizable.css", true); bundle.AddFile("~/Content/themes/base/jquery.ui.selectable.css",true); bundle.AddFile("~/Content/themes/base/jquery.ui.accordion.css",true); bundle.AddFile("~/Content/themes/base/jquery.ui.autocomplete.css",true); bundle.AddFile("~/Content/themes/base/jquery.ui.autocomplete.css", true); bundle.AddFile("~/Content/themes/base/jquery.ui.dialog.css",true); bundle.AddFile("~/Content/themes/base/jquery.ui.slider.css", true); bundle.AddFile("~/Content/themes/base/jquery.ui.tabs.css", true); bundle.AddFile("~/Content/themes/base/jquery.ui.datepicker.css",true); bundle.AddFile("~/Content/themes/base/jquery.ui.progressbar.css",true); bundle.AddFile("~/Content/themes/base/jquery.ui.theme.css", true);
BundleTable.Bundles.Add(bundle); } }
}

Listing 2: Simplied custom bundler code using the AddDirectory() method
public class MyBundler { public static void init() { IBundleTransform jstransformer; IBundleTransform csstransformer;
#if DEBUGjstransformer = new NoTransform("text/javascript"); csstransformer = new NoTransform("text/css"); #else jstransformer = new JsMinify(); csstransformer = new CssMinify(); #endif
var bundle = new Bundle("~/Scripts/js", jstransformer); bundle.AddDirectory("~/Scripts/","*.js",true, true); BundleTable.Bundles.Add(bundle);
bundle = new Bundle("~/Content/css", csstransformer); bundle.AddDirectory("~/Content/", "*.css", true, true);
BundleTable.Bundles.Add(bundle); } }

Listing 3: NoTransform transformation Class
public class NoTransform : IBundleTransform { readonly string _contentType;
public NoTransform(string contentType) { this._contentType = contentType; }
public void Process(BundleContext context, BundleResponse response) { response.ContentType = this._contentType; } }

Listing 4: YUI Compressor transformation class
using System.IO;using System.Web.Optimization;using Yahoo.Yui.Compressor;
namespace Bundler.Utilities{ public enum contentType { javascript, css }
public class YUITransform : IBundleTransform { readonly string _contentType = string.Empty;
public YUITransform(contentType contentType) { if (contentType == contentType.css) { this._contentType = "text/css"; } else { this._contentType = "text/javascript"; } }
public void Process(BundleContext context, BundleResponse bundle) { bundle.ContentType = this._contentType;
string content = string.Empty;
foreach (FileInfo file in bundle.Files) {
using (StreamReader fileReader = new StreamReader(file.FullName)) { content += fileReader.ReadToEnd(); fileReader.Close(); }
}
bundle.Content = Compress(content); }
string Compress(string content) { if (_contentType == "text/javascript") { return JavaScriptCompressor.Compress(content); } else { return CssCompressor.Compress(content, CssCompressionType.StockYuiCompressor); } } }}

3/17/2012

Verify Whether a SQL Server Agent Job is Running

DECLARE @jobname sysname  ='Running Job' -- Enter the job name here
SET NOCOUNT ON
IF NOT EXISTS (SELECT * FROM msdb..sysjobs Where Name = @jobname)
BEGIN
 PRINT 'Job does not exists'
END
ELSE
BEGIN
 CREATE TABLE #xp_results
 (
 job_id                UNIQUEIDENTIFIER NOT NULL,
 last_run_date         INT              NOT NULL,
 last_run_time         INT              NOT NULL,
 next_run_date         INT              NOT NULL,
 next_run_time         INT              NOT NULL,
 next_run_schedule_id  INT              NOT NULL,
 requested_to_run      INT              NOT NULL, -- BOOL
 request_source        INT              NOT NULL,
 request_source_id     sysname          COLLATE database_default NULL,
 running               INT              NOT NULL, -- BOOL
 current_step          INT              NOT NULL,
 current_retry_attempt INT              NOT NULL,
 job_state             INT              NOT NULL
 )
 INSERT INTO  #xp_results
 EXECUTE master.dbo.xp_sqlagent_enum_jobs 1, 'sa'
 IF EXISTS (
 SELECT 1 FROM #xp_results X
 INNER JOIN
 msdb..sysjobs J ON X.job_id = J.job_id
 WHERE x.running = 1 AND j.name = @jobname)
 BEGIN
  Print 'Job is Running'
 END
 ELSE
 BEGIN
 Print 'Job is not Running'
 END
 DROP TABLE #xp_results
END

10/22/2011

The Baker’s Dozen: 13 Transact SQL Programming Tips - Part I


Even with all the new features in the Microsoft SQL Server Business Intelligence (BI), sometimes the only way to accomplish a task is with good old fashioned T-SQL code. (Fortunately, “code” is the acronym for this great magazine!) In this latest installment of The Baker’s Dozen, I’ll present 13 T-SQL programming tips that could help you accomplish different database tasks.
What’s on the Menu?
Getting right to the point, here are the 13 items on the menu for this article:
  • A T-SQL example that allocates data in one table based on percentages from another table, where you might learn an unexpected lesson about data types.
  • The Baker’s Dozen Spotlight: A T-SQL example that uses the MERGE statement in a data warehousing scenario.
  • A T-SQL example that performs the equivalent of a MEDIAN function.
  • A T-SQL example that queries SQL Server system tables to retrieve specifics about snapshots.
  • A T-SQL example to demonstrate the difference between identity columns and GUID columns.
  • A T-SQL example to show different ways to perform queries using partial text searches, and how to use SQL Server tools to evaluate performance.
  • The Baker’s Dozen Potpourri: An example of T-SQL Ranking and Aggregation and the dangers of trying to accomplish everything in one query.
  • An example of using PIVOT where the spreading element is dynamic.
  • Determining a Percentile over a range of values.
  • A potential “gotcha” when performing a WHERE with an OUTER JOIN.
  • Manually setting an identity column.
  • Performing a rollback on a TRUNCATE.
  • Creating a Date Dimension.
The Demo Database for the Examples
With just a few exceptions, the examples use the AdventureWorks2008R2 database. You can find AdventureWorks2008R2 on the CodePlex site. If you’re still using SQL Server 2008 and not 2008R2, the examples will still work - you’ll just need to change any 2008R2 references to 2008.
Tip 1: Performing an Allocation
Suppose you receive budget data at the region level, and you need to allocate it downward to the market or account level, based on each market/account’s percentage of share of the region. This scenario occurs in data warehouse scenarios where a developer must allocate a measure based on some weighted %. The developer needs to be careful, not only to implement the allocation method correctly, but also to ensure that the sum of the allocated numbers equal the original sum of the measure being allocated.
Listing 1 shows an example, using the AdventureWorks2008R2 database. The example uses the tables Purchasing.PurchaseOrderHeader and Purchasing.PurchaseOrderDetails, and allocates the freight from the order header table down to the product line items in the order detail table, for each purchase order. Stated simply, if order A has $100 in freight, and order A has two line items (1 and 2) with line items order dollars of $500 and $1,500 respectively, then line item 1 would receive $25 of the freight and line item 2 would receive $75 of the freight. This is because line item 1 had 25% of the total order dollars and line item 2 had 75% of the line item dollars.
This certainly seems simple enough - determine each line item allocation ratio (LineItemRatio) by taking the line item dollars (OrderQty * UnitPrice) and dividing by the SubTotal of order dollars in the order header table.
(OrderQty * UnitPrice)    / POH.SubTotal as LineItemRatio 
After that, you would take the LineItemRatio and multiply by the Freight, to determine the allocated freight for each line item. Then you’d sum all the allocated freights (which would sum to $1,583,807.6975) and compare that to the sum of freight in the order header table ($1,583,978.2263). But that’s off by roughly $170!
Now, one might argue that the difference is insignificant - after all, $170 is roughly a hundredth of a percent of the 1.5 million in total freight. However, it’s possible that accountants might require (with good reason) that the numbers either match or are within a few pennies. So are we off by $170 because of simple rounding?
It’s actually a bit more complicated. The culprit here is the money data type. The UnitPrice in the order detail table is stored as a money data type, which has a fixed scale of four decimal positions. Therefore, any ratio that we derive from a money data type will also contain four decimal positions. This means that the sum for allocated freights (for any one order) will differ from the original order freight by several cents or possibly a few dollars. When you aggregate that difference across thousands of orders, you have the explanation for the difference of $170.
The solution is to cast the result of the numerator (OrderQty * UnitPrice) as a decimal or a floating point data type, or simply multiply the numerator by 1.0 to force a cast, like so:
(OrderQty * UnitPrice) * 1.0     / POH.SubTotal as LineItemRatio  Cast( (OrderQty * UnitPrice) as float)     / POH.SubTotal as LineItemRatio 
Figure 1 shows a partial result with the allocation ratio going well beyond four decimals. When we apply this logic, the difference across all orders is down to 0.000077 of a penny! I challenge anyone to come closer than that!
Click for a larger version of this image. 
 

Figure 1: Results of allocation.


Listing 1: T-SQL code to perform an allocation
use AdventureWorks2008R2goselect sum(Freight) as HeaderFreightSum from                      Purchasing.PurchaseOrderHeader
select *, LineItemRatio * Freight as AllocatedFreight from    (select POH.PurchaseOrderID,             cast(POH.OrderDate as DATEas OrderDate,             SubTotal, Freight, LineTotal, POD.ProductID,             (OrderQty * UnitPrice) * 1.0  / POH.SubTotal                                    as LineItemRatio           FROM Purchasing.PurchaseOrderHeader  POH            JOIN Purchasing.PurchaseOrderDetail POD ON                poh.PurchaseOrderID =                 pod.PurchaseOrderID ) TempAliasORDER BY PurchaseOrderID COMPUTE sum( LineItemRatio * Freight)

Using the Visual Studio New Project Dialog Box


Continuing on our odyssey exploring the features of Visual Studio 2010, we turn our attention to the New Project dialog box. You noticed a difference no doubt, but may not be aware of just how much it has changed. Sit back, relax, open up Visual Studio 2010 and follow along as we dive into the details.
Press CTRL + SHIFT + N to bring up the New Project dialog box shown in Figure 1. How many times have you come here only to do exactly the same thing you did in Visual Studio 2008? Most people do. Look again at this dialog and notice, in particular, the left-hand side that shows project template organization.
Click for a larger version of this image.

Figure 1: The New Project dialog box in Visual Studio 2010.
Recent Templates
Much like Pavlov’s famous experiment, when we see the New Project dialog we immediately just dig through the Installed Templates, find our project template of choice, and move on. Stop and ask yourself a simple question: “How many templates do I actually use?” I’ve asked thousands of developers the number of templates they use every day, week, month, and year. The answers are pretty consistent across the board-hardly any of them use more than 3-5 project templates in any given year.
It makes sense when you think about it. If you are a web developer then you will most likely stick with one of the web project templates over and over again. Granted you may use that template several hundred times but it is only one project template. So why should you dig though a sea of installed templates just to get to the one that you use all the time? The simple answer is you shouldn’t. Figure 2 shows the new Recent Templates section.
Click for a larger version of this image.

Figure 2: Recent Templates.
The concept is both simple and elegant: just show the last five most recently used templates. That’s it. No more digging through all the installed templates to find the ones you use most often. I’ve found that most people, once they learn of this feature, just stay in this area most of the time except for the rare times when they need a template not listed here already.
Searching Project Templates
Even with the Recent Templates section you will still need to occasionally dig into areas like the Installed Templates to find one that you need. Don’t go blindly looking for the templates, just search for them instead! Figure 3 shows the new search area that you can use to find project templates.
Click for a larger version of this image.

Figure 3: Search Templates.
The usage is pretty straightforward but requires a little orientation. Let’s say you are searching for web projects. Simply type in the word web and see the results show in Figure 4.
Click for a larger version of this image.

Figure 4: Search Templates result.
Unfortunately it shows all languages and we just want to see the Visual Basic templates. No problem! Just type vb (case doesn’t matter) anywhere in the search to have it filter by language as shown in Figure 5.
Click for a larger version of this image.

Figure 5: Search Templates result filtered by language.
All languages have shorthand syntax to make it easy to search them like C#, C++, and F#, for example. There is one problem with this example however: it isn’t really necessary. You could pretty much get the same result just by expanding the Visual Basic node and going to the Web section in the New Project dialog box as shown in Figure 6.
Granted it’s not an exact match. Visual Web Part isn’t in the list in Figure 6 but it’s pretty close. So while there is some value to using search with installed templates, I believe the real value is when you are dealing with a set of unknown templates.
Click for a larger version of this image.

Figure 6: Web section in Visual Basic project templates.
Online Templates
By now hopefully you have heard of the Visual Studio Gallery which can be found at:
Essentially this is a collection of Microsoft and community-created content to enhance your Visual Studio experience. Fortunately we just use Online Templates in the New Project dialog box as shown in Figure 7 to get access to the project templates from the Visual Studio Gallery.
Click for a larger version of this image.

Figure 7: Online Templates.
As you can see the templates here are organized into broad categories under the Templates node. Lucky for us we don’t need to root around in here looking for specific templates. Just search for your desired template! This is where the Search really shines in my opinion.
Let’s put in C# WPF (again, case doesn’t matter) in the search area and see the result we get shown in Figure 8.
Click for a larger version of this image.

Figure 8: Online Templates search result.
Now we have a filtered list of templates that mention WCF in them or are related to WCF in some way. With that said, be careful about filtering by language in this area. There tends to be a lot of false positives when narrowing down by language. In this example I encountered three non-C# templates in the search result.
Sorting Templates
Last on the list of new features in the New Project dialog box is the Sort By drop-down box. The options here change depending on context. Figure 9 shows the options for Installed Templates available to us.
Click for a larger version of this image.

Figure 9: Sort Options for Installed Templates.
There are many people who don’t like the default sort order for templates. Personally I never had a problem with it but if you want to change the order you can now sort ascending or descending as well.
Also, based on your context, this list will change. Figure 10 shows the sort options for Online Templates.
Click for a larger version of this image.

Figure 10: Sort Options for Online Templates.
More, and different, choices present themselves so we can arrange the templates by the most appropriate information. Generally speaking, I tend to stick with Highest Ranked or Most Downloads as a good indicator of the better templates to use.
Final Thoughts
Clearly there are many new features for you to explore in the Visual Studio 2010 New Project dialog box. It’s time to go beyond what you were used to in prior versions of Visual Studio and leverage these great productivity enhancements. Enjoy!
Mr. Zain Naboulsi Jr

10/13/2011

VS 2010 with Multi-Monitor Support


Using Multiple Monitors

VS 2008 hosts all documents/files/designers within a single top-level window – which unfortunately means that you can’t partition the IDE across multiple monitors.
VS 2010 addresses this by now allowing editors, designers and tool-windows to be moved outside the top-level window and positioned anywhere you want, and on any monitor on your system.  This allows you to significantly improve your use of screen real-estate, and optimize your overall development workflow.
Taking advantage of the multi-monitor feature is really easy to-do.  Simply click on a document tab or tool-window and drag it to either a new location within the top-level IDE window – or outside of the IDE to any location on any monitor you want:
step2
You can later drag the document/window back into the main window if you want to re-dock it (or right click and choose the re-dock option). 
Visual Studio remembers the last screen position of documents when saved – which means that you can close projects and re-open them and have the layout automatically startup where you last saved it.

Some Multi-Monitor Scenarios

Below are some screen-shots of a few of the scenarios multi-monitor enables (obviously there are many more I’m not covering).  Pretend each window in the screenshots below is on a different monitor to get the full idea…
Code source file support:
Demonstrates how code files can be split up across multiple monitors.  Below I’ve kept a .aspx file in the main IDE window and then moved a code-behind file and a separate class file to a separate screen:
step3
Tool window support:
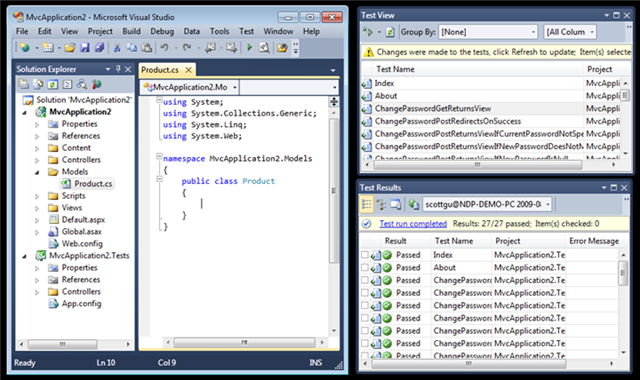
Demonstrates how any tool window/pane within VS10 can be split across multiple monitors.  Below I’ve moved the test runner tool windows to a separate screen:
step5
Designer support:
Demonstrates how a designer within VS can be split across multiple monitors.  Below I’ve moved the WPF/Silverlight WYSWIYG designer and the property grid to a separate screen (the code behind file is still in the main window). Note how the VS10 property grid now supports inline color editors, databinding, styles, brushes, and a whole bunch more for WPF and Silverlight applications (I’ll cover this in later blog posts):
step6

Summary

If you work on a system that has multiple monitors connected to it, I think you are going to find the new multi-monitor support within VS10 a big productivity boost.
If you don’t already have multiple monitors connected to your computer, this might be a good excuse to get some… :-)
Hope this helps,